Local WMI querying is straightforward to implement and troubleshoot — but remote WMI querying is another story. Indeed, setting up secure remote WMI querying for a user with no admin rights is a daunting task.
This blog can help. I’ll walk you through the steps I used to enable a standard domain user to query the Microsoft SQL Server WMI namespace class on a Windows Server 2012 R2 running Microsoft SQL Server 2016.
Overview
Here are the steps we need to complete:
- Create a standard AD user.
- Check the user’s permissions.
- Set up the remote Microsoft SQL Server.
- Configure the DCOM security settings to allow remote access.
- Set up the WMI Control properties.
- Modify the DACL.
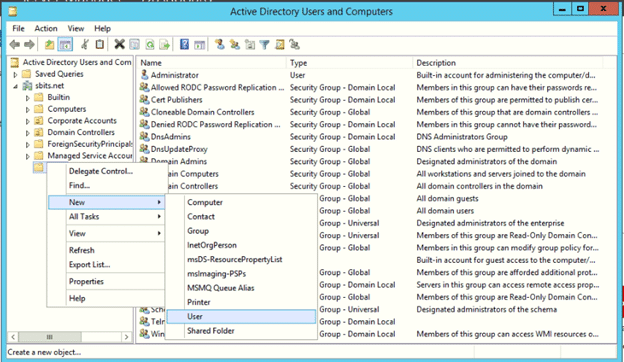
Step 1. Create a standard AD user.
Using the Active Directory Users and Computers applet, create a new user. Do not make them a member of any groups other than Domain Users.

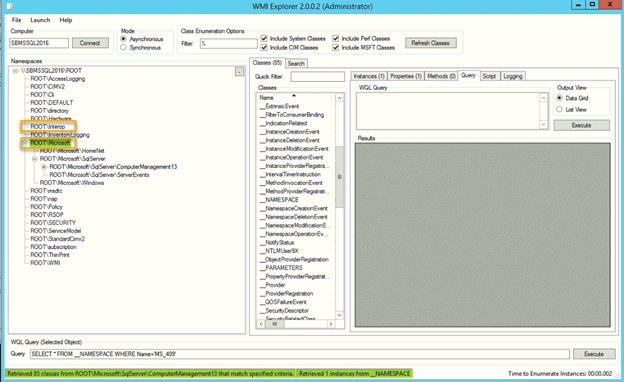
Step 2. Check the user’s permissions.
Let’s assume the WMI namespace classes we need to query are ROOT\Interop and ROOT\Microsoft. Using WMI Explorer (shown below), we can review the WMI classes in a namespace and traverse through the methods for each class. By logging in using the new account, we can quickly verify that it has no permissions for the two WMI namespace classes we want to query.
Step 3. Set up the remote Microsoft SQL Server.
Next, make sure the remote server meets the following requirements:
- Ensure that the following ports in Windows Firewall are open: port 135 and the range of dynamic ports 49152–65535.
- In the Windows services applet, check that the Windows Management Instrumentation service is running and set to start automatically.
- In the Windows Services applet, make sure that the Remote Procedure Call (RPC) service is running and set to start automatically.
- Ensure that the Distributed Component Object Model (DCOM) is configured and enabled.
Step 4. Configure the DCOM security settings to allow remote access.
To configure the DCOM security settings to allow remote access, run the Component Services applet (dcomcnfg.exe).
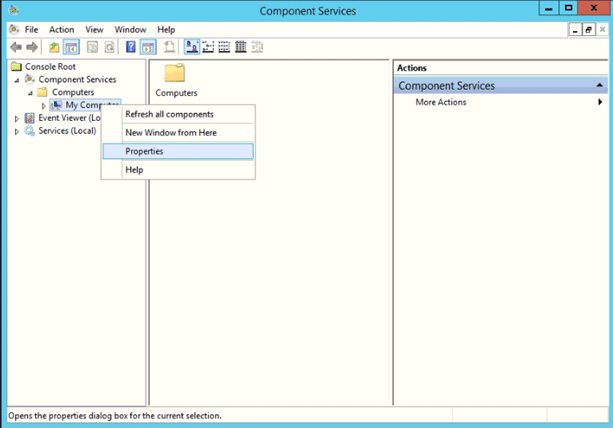
4a. Open the My Computer Properties dialog.
Navigate to the My Computer node and right-click on Properties:
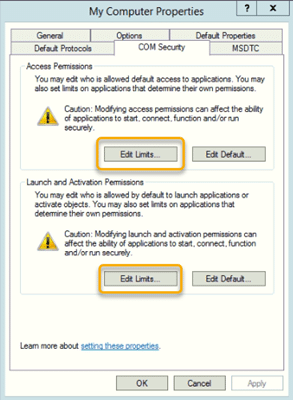
4b. Go to the COM Security tab.
On the My Computer Properties screen, navigate to the COM Security tab. We need to edit the limits for both access permissions and launch and activation permissions.
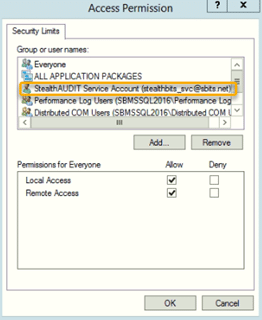
4c. Set access permissions.
In the Access Permissions section, click Edit Limits. In the Access Permission dialog, make the following changes:
- In the Group or user names section, click the Add button and add the domain user created in Step 1.
- In the Permissions for Everyone section, ensure that the Allow box is checked for both Local Access and Remote Access.
Click OK to save your changes.
4d. Set up launch and activation permissions.
Back on the My Computer Properties screen, in the Launch and Activation Permission section, click Edit Limits. In the Launch and Activation Permission dialog, make the following changes:
- In the Group or user names section, click the Add button and add the domain user created in Step 1.
- In the Permissions for Everyone section, ensure that the Allow box is checked for all the options (Local Launch, Remote Launch, Local Activation and Remote Activation).
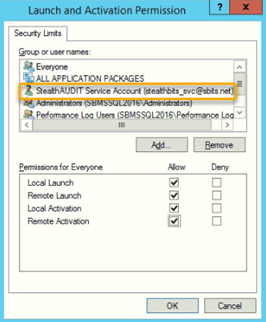
Note: If you fail to make these changes, you will get the error 0x80070005 E_ACCESS_DENIED when a WMI query is executed against the remote server. More information on troubleshooting WMI Access Denied errors can be found here.
Step 5. Set up the WMI Control properties.
To set the permission to the required namespaces, run the WMI Control applet (wmimgmt.msc).
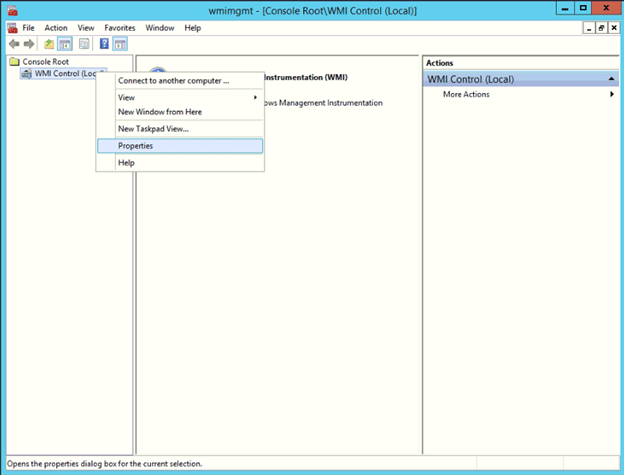
5a. Go to the Properties dialog.
In the WMI Control applet, right-click the WMI Control (Local) node and choose Properties.
5b. Select a namespace.
In the WMI Control (Local) Properties window, choose the first namespace you want to query. As you’ll recall, in our example, that’s the Interop and Microsoft namespaces. Let’s start with the Microsoft namespace. We select it and click the Security button.
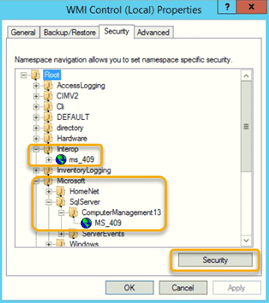
5c. Add the user you created and grant them permissions for the namespace.
In the Group or user names section, use the Add button to add the user created in Step 1. Then select that user and, in the lower section, check the Allow box for each required permission.

5d. Enable inheritance of permissions.
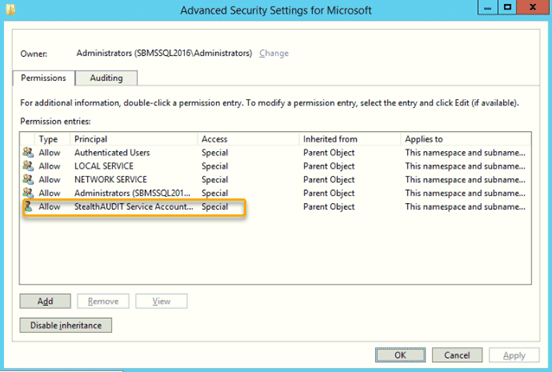
Since classes in a namespace do not inherit permissions set at the namespace level, we need to click the Advanced button. On the Advanced Security Settings dialog, go to the Permissions tab and click the Add button to add the user created in Step 1.
5e. Set up the remaining namespaces.
Repeat steps 5b–5d for each additional namespace that you want to be able to query.
Step 6. Modify the DACL.
The next step is to modify the Discretionary Access Control List (DACL) and grant permissions to the user created in Step 1. You can find more information on DACL security here.
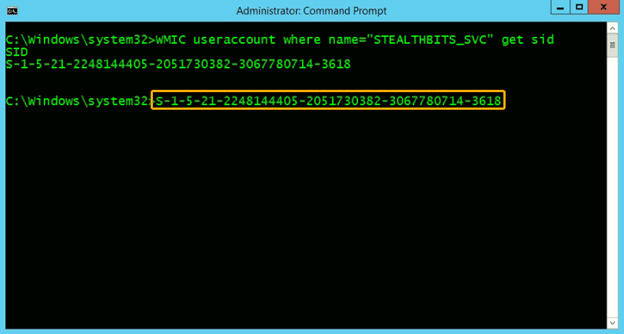
6a. Get the user’s SID.
First, get the SID for the user, as shown here:
6b. Grant the user permissions to the SCMANAGER and MSSQLSERVER services.
We need to add the user’s SID to the SCMANAGER and MSSQLSERVER services. But first, let’s extract the current permissions for those services to a text file, which will serve as a backup in case we need to revert our changes. We can do that using the Service Controller utility (sc.exe):
C:\SC.exe SDSHOW SCMANAGER > SCMANAGER.TXT

C:\SC.exe SDSHOW MSSQLSERVER > MSSQLSERVER.TXT
Now we can use the SDSET option to add the user permissions required to each service:
SCMANAGER
Get the original setting from the text file:
"D:(A;;CC;;;AU)(A;;CCLCRPRC;;;IU)(A;;CCLCRPRC;;;SU)(A;;CCLCRPWPRC;;;SY)(A;;KA;;;BA)(A;;CC;;;AC)S:(AU;FA;KA;;;WD)(AU;OIIOFA;GA;;;WD)"Using the original output above we add a new access control entry (ACE) for the user with permissions required and use the SC SDSET SCMANAGER command to make the change. The new ACE must be added after the D: and before the S: and will look like (A;;CCLCRPRC;;;S-1-5-21-2248144405-2051730382-3067780714-3618).
SC.exe SDSET SCMANAGER "D:(A;;CC;;;AU)(A;;CCLCRPRC;;;IU)(A;;CCLCRPRC;;;SU)(A;;CCLCRPRC;;;S-1-5-21-2248144405-2051730382-3067780714-3618)(A;;CCLCRPWPRC;;;SY)(A;;KA;;;BA)(A;;CC;;;AC)S:(AU;FA;KA;;;WD)(AU;OIIOFA;GA;;;WD)"MSSQLSERVER
Similarly, get the original DACL for MSSQLSERVER from the exported file:
"D:(A;;CCLCSWRPWPDTLOCRRC;;;SY)(A;;CCDCLCSWRPWPDTLOCRSDRCWDWO;;;BA)(A;;CCLCSWLOCRRC;;;IU)(A;;CCLCSWLOCRRC;;;SU)S:(AU;FA;CCDCLCSWRPWPDTLOCRSDRCWDWO;;;WD)"Then use the SC SDSET MSSQLSERVER command as shown here to add the SID with all permissions to the MSSQLSERVER service:
C:\SC SDSET MSSQLSERVER "D:(A;;CCLCSWRPWPDTLOCRRC;;;SY)(A;;CCDCLCSWRPWPDTLOCRSDRCWDWO;;;BA)(A;;CCDCLCSWRPWPDTLOCRSDRCWDWO;;;S-1-5-21-2248144405-2051730382-3067780714-3618)(A;;CCLCSWLOCRRC;;;IU)(A;;CCLCSWLOCRRC;;;SU) S:(AU;FA;CCDCLCSWRPWPDTLOCRSDRCWDWO;;;WD)"Success!
Now you can execute a WMI query against a remote Microsoft SQL Server as a standard domain user.

How Netwrix Can Help
Remote WMI querying is of a multitude of tasks required to administer and secure today’s complex IT environments. Netwrix StealthAUDIT provides the comprehensive capabilities you need to take control of your data security like never before. It offers:
- Data governance: Easily set up and enforce granular access controls to secure your content.
- Permissions auditing: Understand, track and control access rights to safeguard your data and systems.
- Database assessment: Proactively identify misconfigurations, access control issues and other security vulnerabilities in the database environment.
- Activity monitoring: Get alerted to potential threats with automated tracking and analysis of events in every database and instance.
- Compliance reporting: Streamline audits with predefined reports that are easy to customize to meet your unique needs.