
Microsoft announced the release of SQL Server 2019 at Ignite 2019 with some exciting new features including Scalar UDF inlining, always-on connection, and Linux support. In my previous blog, I walked through the steps of integrating a Linux host running on CentOS 8 into a Windows Active Directory (AD) domain configured on Windows 2012 R2 Server Standard Edition. In this blog, I will be using the same AD domain joined CentOS 8 server to install and configure SQL Server 2019 for Linux.
Whether you are installing SQL Server 2019 for Linux on a bare-metal server or a virtual machine ensure that the file system is either XFS or EXT4. Other types of file systems are not supported. While Network File System (NFS) version 4.2 or higher is supported, I do not recommend using an NFS file share for installing SQL Server mainly due to performance reasons. The minimum hard disk space required is 6 GB and the system needs to be configured with a minimum of 2 GB of RAM and 2 processor cores.
Step 1) Ensure that the hostname along with the fully qualified domain name (FQDN) is specified in the /etc/hosts file. The hostname cannot be localhost as it is mapped to the loop-back adapter 127.0.0.1. If you need to change the existing hostname, use the following command to change it to the desired name. There is no need to specify the FQDN as part of the hostname.
Step 2) Standard installation of CentOS 8 should contain phython2 and phython3 packages if it does not then install and configure python2 so that SQL Server 2019 can see /usr/bin/python as the default python interpreter.
[root@sblinmssql2019 ~]# dnf install python2
[root@sblinmssql2019 ~]# dnf install python3
You can verify which versions of Python are installed as shown in the screen shot below:

Since there is no default python command on CentOS 8, it needs to be configured and pointed to python2 using the following command and choosing Option 2, which will create a symbolic link from /usr/bin/python2 to /usr/bin/python:
[root@sblinmssql2019 ~]# alternatives --config python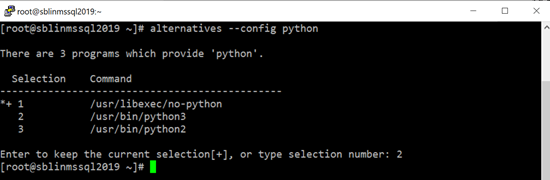
Step 3) Install openssl10 using the following command:
[root@sblinmssql2019 ~]# dnf install compat-openssl10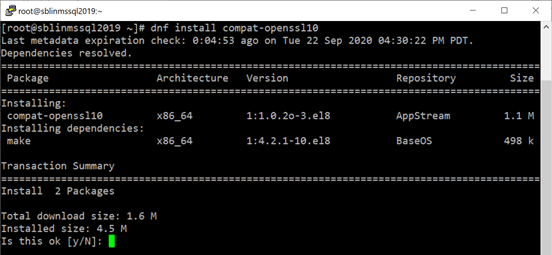
Step 4) Configure the Microsoft SQL Server 2019 Red Hat repository configuration file:
[root@sblinmssql2019 ~]# curl -o /etc/yum.repos.d/mssql-server.repo https://packages.microsoft.com/config/rhel/8/mssql-server-2019.repo
[root@sblinmssql2019 ~]# curl -o /etc/yum.repos.d/msprod.repo https://packages.microsoft.com/config/rhel/8/prod.repo
Step 5) Install SQL Server 2019 using yum:
[root@sblinmssql2019 ~]# yum install -y mssql-server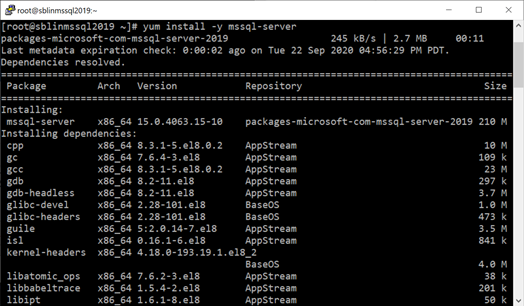
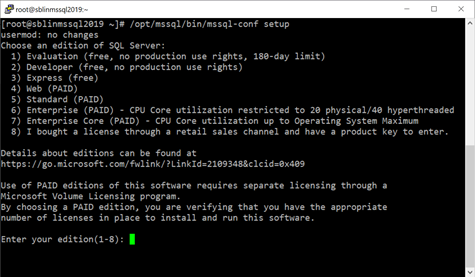
Step 6) Once the installation completes successfully, the next step is to configure the SQL Server instance. Prior to issue the command below, I also recommend that you add /opt/mssql/bin to the PATH in .bash_profile file.
[root@sblinmssql2019 ~]# /opt/mssql/bin/mssql-conf setupStep 7) First step in the configuration process requires you to choose the SQL Server Edition type. Depending on the type of licensing you own, choose the appropriate option.
Step 8) Next you need to enter a password for the sa user. After specifying the password, the installer will create a symbolic link to add the SQL Server daemon as a service.
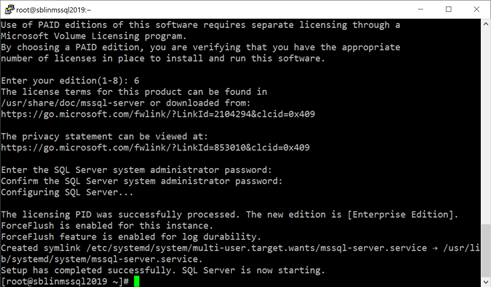
Step 9) The installer will configure the SQL Server daemon to start automatically at system reboot. Check the status of the daemon and make sure it is running.
[root@sblinmssql2019 ~]# systemctl enable mssql-server
[root@sblinmssql2019 ~]# systemctl status mssql-server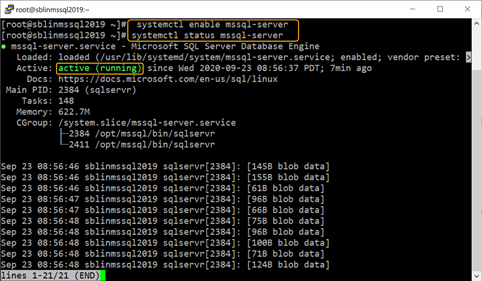
Step 10) Check to see if the firewall daemon is active, if it is, find out the name of the default zone and add port 1433 to the list. TCP Port 1433 is the default port used by SQL Server. If you prefer to use a different port other than 1433, ensure that you use the right port number. In addition, ensure that the right network adapter is bound to the default zone and the name of the default zone is specified. Reload the firewall configuration after the port exception is added to the list.
[root@sblinmssql2019 ~]# firewall-cmd --status
[root@sblinmssql2019 ~]# firewall-cmd –-get-default-zone
[root@sblinmssql2019 ~]# firewall-cmd –-get-active-zones
[root@sblinmssql2019 ~]# firewall-cmd –-zone=public –add-port=1433/tcp – permanent
[root@sblinmssql2019 ~]# firewall-cmd –-reload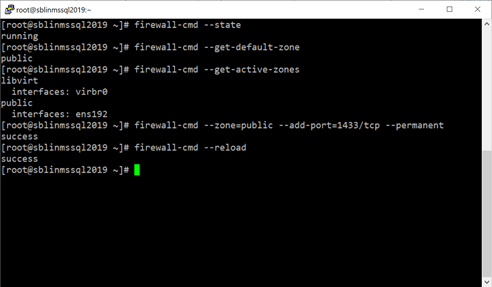
Step 11) While not required and if you need to connect to SQL Server locally and use tools, such as sqlcmd, bcp, you need to install them. Also, add /opt/mssql-tools/bin to the PATH in .bash_profile file.
[root@sblinmssql2019 ~]# yum install -y mssql-tools unixODBC-devel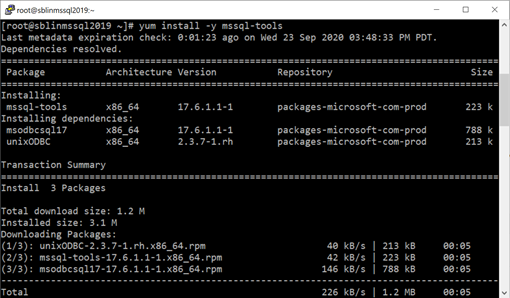
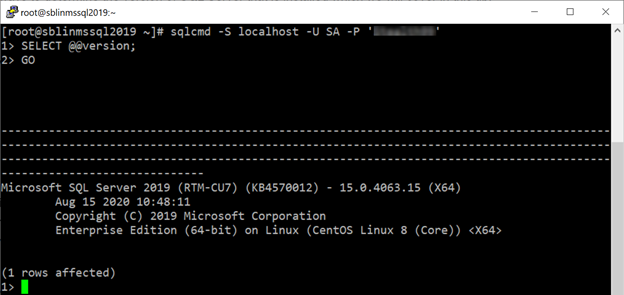
Step 12) Connect to the SQL Server instance from sqlcmd. If you get 1> prompt, then you successfully connected to the SQL Server instance.
Step 13) Finally if you prefer to change the default port 1433 to a different port, use the following statements to change the port. Once the port number is changed, the SQL Server daemon needs to be restarted for the change to take effect. In addition, you need to add the new TCP Port to the firewall exception rules.
[root@sblinmssql2019 ~]# /opt/mssql/bin/mssql-conf set tcpport 1489
[root@sblinmssql2019 ~]# systemctl restart mssql-server
[root@sblinmssql2019 ~]# systemctl status mssql-server
Now that you set up SQL Server 2019 on CentOS 8, consider StealthAUDIT for auditing permissions, configuration, vulnerabilities in your newly created database. StealthAUDIT can also discover and report on sensitive data that might exist in your databases. To learn more about how Stealthbits can help with auditing your SQL databases operations, visit our website: https://www.stealthbits.com/stealthaudit-for-sql-product

Sujith Kumar has over 25 years of professional experience in the IT industry. Sujith has been extensively involved in designing and delivering innovative solutions for the Fortune 500 companies in the United States and across the globe for disaster recovery and high availability preparedness initiatives. Recently after leaving Quest Software/Dell after 19 years of service he was working at Cirro, Inc. focusing on database management and security. His main focus and area of interest is anything data related.
Sujith has a Master of Science in engineering degree from Texas A&M University and a Bachelor of Science in engineering degree from Bangalore University and has published several articles in referred journals and delivered presentations at several events.
Leave a Reply