Deception technology is a cybersecurity strategy that utilizes decoys to gather information about current threats and attack methodologies used by cybercriminals. The premise of this approach is to offer some sort of bait in your network, such as a fake database that looks like a legitimate one, that attackers will find too enticing to pass up. When a threat actor accesses that decoy, the internal cybersecurity team can gather intelligence on the attacker’s activity and the vulnerabilities they are targeting.
Two examples of deceptive technology are spam traps and honeypots:
- A spam trap is an email address created to identify spam and other unwanted email, which can be a source of malware infection and credential theft.
- A honeypot is a decoy system designed to lure attackers in so IT teams can gather information about their attack methods.
In this article, we will focus on honeypot technology and the different types of honeypot techniques in use today.
Types of Honeypots
Production Honeypots
A production honeypot is used to defend a production network against cyberattacks by redirecting threat actors away from critical systems. It is typically deployed alongside other security tools and controls, such as a firewall, intrusion detection system (IDS) or anti-malware software.
Research Honeypots
A research honeypot is deployed in a controlled environment like a research lab to capture and analyze suspicious traffic activity to uncover new and emerging threats. Research honeypots can also be used to help evaluate the effectiveness of various security tools and protection technologies in combatting new attacks.
Interaction Honeypots
Interaction honeypots are designed to attract threat actors to interact with some type of digital asset. They often simulate a vulnerable system, server or application that attackers commonly seek to exploit. Interaction honeypots come in two categories.
- Low interaction honeypots emulate the most common and vulnerable services and protocols. They are used only for basic detection and monitoring purposes and can be easily deployed due to their simplicity and small size.
- High interaction honeypots simulate complete operating systems or complex application environments. Rather than an individual service or protocol, they emulate all system resources and components, including the kernel, drivers, services and applications. Due to their complexity, they are more challenging to deploy and maintain. Interpreting their findings may require some expertise as well.
Honeypot-as-a-Service
While honeypots can be deployed as an appliance or software application within an on-prem network, there are also many cloud solutions available today. A honeypot-as-a-service offering enables organizations to outsource the deployment and support of a honeypot solution to a third-party provider. A honeypot service provider has support personnel and cybersecurity experts that are highly trained and know how to fully leverage collected intelligence. They can also help customers with their incident response strategy.
Addressing Security Threats with Honeypots
Let’s see how honeypots can help address a common threat: Pass-the-Hash (PtH) attacks. PtH is a technique that attackers use to gain unauthorized access to a computer system by capturing the hashed password of a user and using it to authenticate using a tool like Mimikatz — without ever knowing the plaintext password.
Detecting Credential Theft with HoneyHash
To identify adversaries attempting Pass-the-Hash attacks, we will use a technique called HoneyHash. It involves planting credentials for a fictional account in LSASS memory on endpoints. If an adversary tries to misuse the credentials for a PtH attack, the event will be logged for analysis.
Using a Script to Roll out a Honeyhash
Let’s look at a possible ways to deploy honeyhashes across your environment using a script.
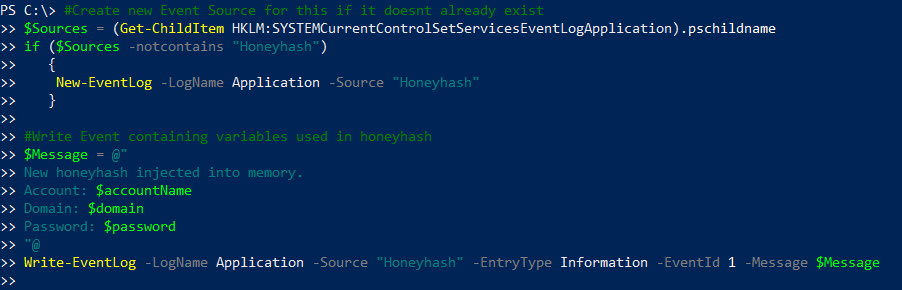
Step 1. Create the script.
To ensure that our HoneyHash will always be implanted in LSASS while a computer is running, we will create a computer startup script. It needs to do several key tasks:
- Create a unique user ID for each endpoint — So that we can determine where an attack happened, we need to have the script create a unique user ID each time it runs:

- Create a password — The script also needs to create a password that appears to be legitimate. We do this by hashing the name of the computer on which the script is run:

- Register the credentials — The script also needs to grab the domain and register the HoneyHash credentials:

- Log the HoneyHash credentials — Each time an endpoint starts up, the script will run, generating a new HoneyHash username and password, and we need to track those credentials so we can pinpoint attempts to steal them. The following code will register a new event source called HoneyHash, and put information about new HoneyHash credentials in the Windows event log:
Step 2. Push out the script to all desired endpoints and run it locally.
Once we have our script, there are multiple options for deploying it across the environment, including Group Policy and Intune.
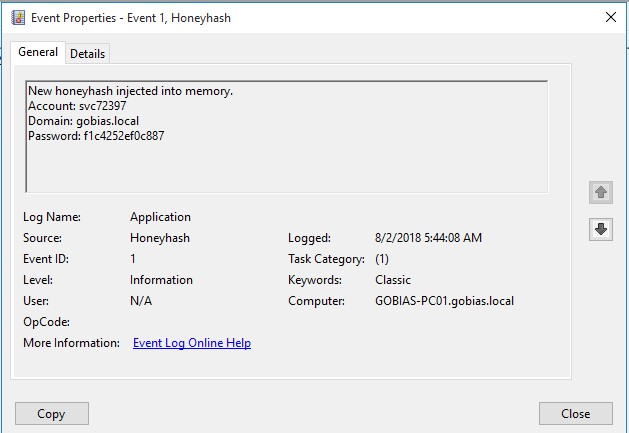
At each startup, it will generate a unique HoneyHash user ID and password for that endpoint, and the log will detail the creation of the HoneyHash, including when it was implanted in memory:
Step 3. Analyze the data to spot attacks.
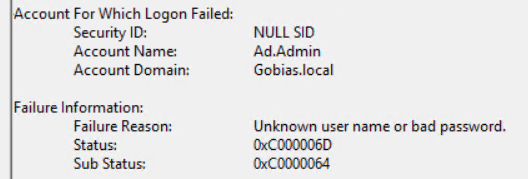
Now we need to collect and analyze the data. First, we need to identify when an attacker attempts to use the stolen credentials. Whether the attacker attempts a Pass-the-Hash attack or an interactive login, their action will result in a failed authentication event (Event ID 4625) that contains the user ID of our HoneyHash account, so it is easy to tie the event to the HoneyHash.
Here’s an event ID 4625 showing a failed logon attempt using the HoneyHash user ID Ad.Admin:
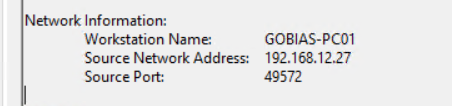
This event shows the source computer and IP address where the authentication attempt originated from:
Spotting Recon Activity for a HoneyHash
However, some attacker are smart enough to not attempt to use credentials until they do some basic investigation through LDAP reconnaissance. For example, the attacker might check which groups the user account is a member of using the following command:
([ADSISearcher]"(samaccountname=AD.Admin)").FindOne().GetDirectoryEntry().memberOfThey would quickly see that the HoneyHash account is not a real account and therefore would not attempt to use it in a Pass-the-Hash attack:

Unfortunately, there is no easy way to detect this recon activity natively, and approaches such as network monitoring can be expensive. But Netwrix StealthINTERCEPT makes it easy to monitor for LDAP reconnaissance. The activity shows up on the dashboard like this:
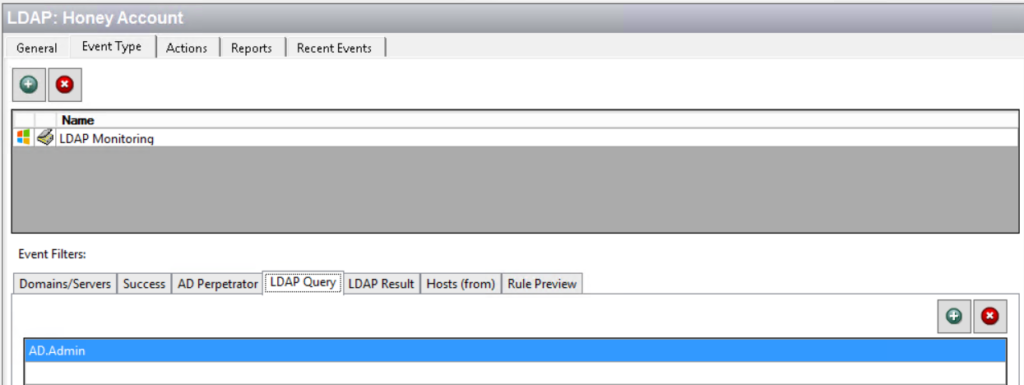
We can see who issued the LDAP query, and when and where it originated:

We have caught the intruder even though they never tried to used the HoneyHash account in a PtH attack!
Collecting Additional Forensics with Sysmon
Knowing that an attacker stole our honeypot credentials is great, but to effectively respond to the attack we need to know more. We may want to know what tool was used by the attacker to retrieve the credentials from LSASS memory.
To extend your data collection to better spot signs of attacks, you can build custom configuration files for Sysmon. Let’s create a config file that will detect two things:
- Use of hacking tools that read the memory contents of processes like Lsass.exe
- Process creation in PowerShell and Mimikatz (identifying the individual actor)
Here is the configuration file:
<Sysmon schemaversion="4.10"> <!-- Capture all hashes --> <HashAlgorithms>*</HashAlgorithms> <EventFiltering> <!-- Event ID 1 == Process Creation. --> <ProcessCreate onmatch="include"> <Image condition="end with">powershell.exe</Image> <Image condition="end with">mimikatz.exe</Image> </ProcessCreate> <!-- Event ID 5 == ProcessTerminate. --> <ProcessTerminate onmatch="include"/> <!-- Event ID 10 == ProcessAccess. --> <ProcessAccess onmatch="include"> <TargetImage condition="is">C:Windowssystem32lsass.exe</TargetImage> </ProcessAccess> <ProcessAccess onmatch="exclude"> <TargetImage condition="is">C:Windowssystem32svchost.exe</TargetImage> </ProcessAccess> <!-- Event ID 11 == FileCreate. --> <FileCreate onmatch="include"/> <!-- Event ID 12,13,14 == RegObject added/deleted, RegValue Set, RegObject Renamed. --> <RegistryEvent onmatch="include"/> <!-- Event ID 15 == FileStream Created. --> <FileCreateStreamHash onmatch="include"/> <!-- Event ID 17 == PipeEvent. --> <PipeEvent onmatch="include"/> </EventFiltering> </Sysmon>All you need to do for the monitoring to kick in is import that configuration file into Sysmon, as follows:
.Sysmon64.exe -c .sysmon_config.xmlThen you will see events show up in your Windows Event Log (Applications and Services Logs/Microsoft/Windows/Sysmon/Operational). For example, here is an event with Event ID 10, which indicates access to LSASS memory:
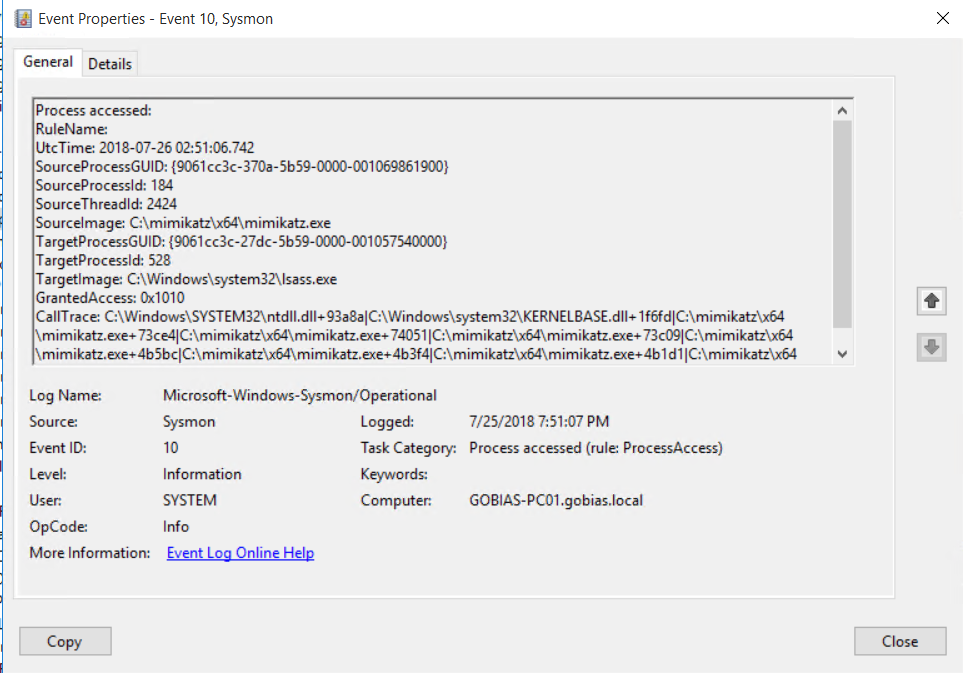
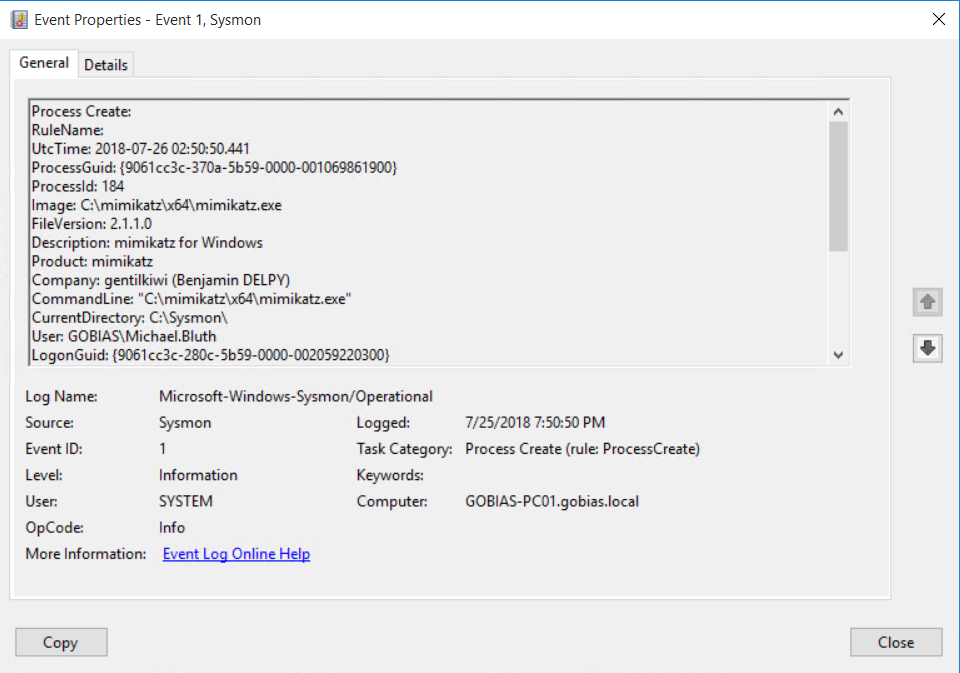
We can see that the tool used was Mimikatz, but not the user who launched the process. To find this critical detail, we can look at Event ID 1, which shows that the Michael.Bluth account performed the credential extraction:
How Netwrix Can Help
The Netwrix Active Directory security solution is a comprehensive security solution for your Active Directory environment. It provides multiple features, including real-time auditing, user behavior analytics and permission analysis, that work together to help protect your organization’s critical assets against unauthorized access, including Pass-the-Hash attacks.
In particular, the following component products can help you defend against PtH attacks.
Netwrix StealthDEFEND offers two powerful techniques for detect Pass-the-Hash attacks:
- Honey tokens — You can inject fake credentials into LSASS memory on target machines and monitor for their use to spot adversaries attempting lateral movement.
- Abnormal behavior detection — Baselining normal user behavior helps you spot anomalous use of accounts indicative of Pass-the-Hash and other lateral movement attacks. Behavior to look for includes:
- An account is used from a host it never authenticated from before.
- An account is used to access a host it never accessed before.
- An account accesses a large number of hosts across the network in a way that contradicts its normal access patterns.
Netwrix StealthAUDIT helps mitigate the risk of Pass-the-Hash attacks being launched in the first place by empowering you to:
- Minimize administrative rights on servers and desktops.
- Monitor for suspicious PowerShell commands that can be used for performing credential extraction and Pass-the-Hash attacks.
- Restrict highly privileged accounts from logging into lower privileged systems.
- Ensure that LSA Protection is enabled on critical systems to make it more difficult to extract credentials from LSASS.


.png)